|

June 19, 2006
Color-code Outlook calendar appointments for easy reference
How many times do you look at your Outlook calendar searching for a specific appointment,
only to see a cluster of white boxes with little to no descriptions? If you want
to see what the appointment is for, this means opening up the appointment item details
and figuring it out from the detailed description. Not only is this frustrating,
but it takes extra time and effort.
Thankfully, Microsoft Outlook features a helpful option to sort your appointments.
Simply apply any of the color labels to all of your appointments, so it only takes
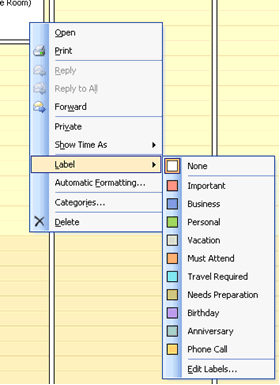
a glance to distinguish between calendar items. Microsoft offers ten different colors
to help you categorize, including “Important,” “Business,” “Personal,” “Birthday”
and so on.
Here's another useful tip for using Microsoft Outlook…
Color-code existing appointments using Microsoft Outlook:
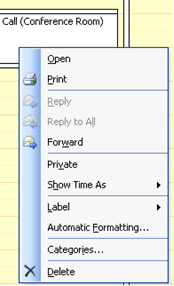
1. Right-click on the calendar appointment item you want to color-code.

2. Select Label from the drop-down menu.

3. Select the appropriate color label for the appointment, and you're done.
Color-code new appointments using Microsoft Outlook:
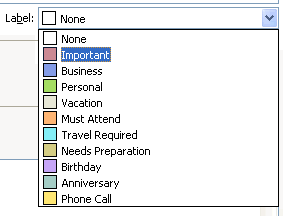
1. When creating a new appointment, click on the drop-down menu for Label: on the right-hand side of the dialog box.

2. Select the appropriate color label for the appointment, and you're done.
Bonus Tip #1
Although you cannot change any of the set ten colors, you can edit any of the color
label text to fit your own needs. Just go to Edit – Label
and select Edit Labels in the drop-down menu. Be sure to keep a
list of the original text labels, though, in case you need them in the future.
Bonus Tip #2
You can use the Automatic Formatting feature to automatically apply a certain color
label to certain appointments. Right-click anywhere in your Outlook calendar and
select Automatic Formatting… to make a rule for any of the color
labels. For instance, you can choose to automatically apply the yellow Phone Call
label to any appointments that contain "Conference Call" in the subject.
|